Start
How to Debloat Windows 11 Safely
I spent a good amount of time trying to fully clean and optimize my fresh Windows 11 install after switching from Windows 10. All the information is out there, but scattered.
So I made this guide that will walk you through how to do a clean install of Windows 11 or safely debloat your existing Windows 11 installation or how to activate Windows 11 for free and legally without any risk.
You’ll also learn how to use Winget to install apps efficiently, remove bloatware from Windows File Explorer, optimize your networking card, and debloat your Browser for better privacy and performance.
All provided scripts are fully open source and safe to run — they don’t install any unwanted software but simply modify Windows 11 hidden settings to help you optimize your system and protect your privacy.
Sources:
- github/UnattendedWinstall
- Schneegans Unattend Generator
- ChrisTitusTech WinUtil
- FR33THY's Ultimate Windows Optimization Guide
- Tiny11Builder
- Massgrave.dev
- Winstall
- Ten Forums
- Eleven Forum
- Winaero Tweaker
Disclaimer: This guide is for educational purposes only. Follow these instructions at your own risk. Always back up your important data before making any system changes.
Fresh Install
Key Features
- Ability to choose any Windows Edition
- Bypasses Windows 11 system requirements
- Skips forced Microsoft account creation during Windows setup
- Removes preinstalled bloatware apps except Microsoft Edge, Notepad and Calculator
- Copilot and Recall is Disabled
- Sets privacy-related registry keys to disable telemetry
- Limits Windows Update to install only security and driver updates and no risky/bloaty features.
- Optimizes registry with various optimization and customization-related keys
- Disables unnecessary scheduled tasks and background services
- Configures Windows services and settings for optimal performance
- Enables the Ultimate Performance power plan
Continue to the Step-by-Step Instructions on how to automate your Windows 11 install with all the above-mentioned fixes.
Fresh Install
Step-by-Step Instructions
- Download Official Microsoft Windows 11 ISO from official Microsoft website..
Choose the last option "Download Windows 11 Disk Image (ISO) for x64 devices" - Download autounattend.xml from GitHub.
Save the officialautounattend.xmlfile to your computer—essential for automating your clean install of Windows 11. - Create a Windows 11 bootable USB with Rufus (Download).
Use Rufus to craft a bootable USB drive from a Windows 11 ISO. - Avoid Rufus "Customize Your Windows Experience" options.
Don’t check any boxes under “Customize Your Windows Experience.” Enabling them can generate a conflicting unattend.xml that overrides your own settings. - Copy
autounattend.xmlto the Windows 11 USB you created.
Place theautounattend.xmlfile in the root directory of your bootable USB drive so Windows Setup can auto-detect it. - Boot from USB and run a clean install.
Insert the USB, boot from it, and proceed with a standard clean install of Windows 11. Your scripts will run automatically during installation. - (Optional) Skip Windows Key.
When being prompted for Windows 11 activation key, you can skip inputting it if you do not have a key to use. We can later activate Windows for free. - Use the Windows Updater after install.
Proceed to part 3. Debloating Existing Install to ensure that all the bloatware removal is applied correctly.
Existing Install
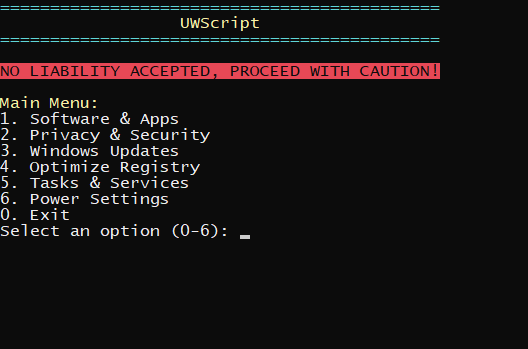
Manual Debloating
- Open PowerShell as Administrator
Windows key + X, then select Powershell or Terminal in (Admin) mode. - Download UWscript.ps1 from Github.
- Right Click on the downloaded
UWscript.ps1and choose "Run with PowerShell". - Follow the prompts to remove bloatware, disable telemetry and tracking, registry optimization and more.
Windows Activation
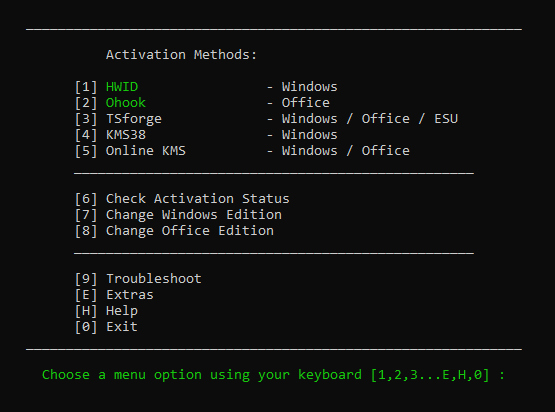
Free Windows 11 Activation
- Open PowerShell
To do that, press the Windows key + X, then select PowerShell or Terminal. - Copy and paste the code below, then press enter.
irm https://get.activated.win | iex- You will see the activation options. Choose the first option.
You now have a fully activated Windows 11.
You can also use this tool to safely activate Outlook for free by choosing second option.
Install Apps Easier
Winget
Option A:
Go to https://winstall.app/
Select all the apps and programs you want on your PC.
Use Winstall built-in options to install all your apps at once without bloat.
Option B:
Manually use winget command in PowerShell.
Search for apps with an example:
winget search braveor
winget search "google chrome"Download apps:
winget install Brave.Braveor
winget install Google.ChromeYou can do the same for all of your favorite programs: Discord, VLC, Notepad++, etc.
Browser Debloat
Registry Fixes
- Attempts to disable telemetry and usage reporting
- Removes unnecessary features and pre-installed bloatware
- Blocks promotional content and unnecessary UI elements
- Removes AI bloat
- Maintains browser functionality while reducing resource usage
- Pre-configures essential extensions:
- uBlock Origin
- Cookie AutoDelete
- Don't f*** with paste
- I still don't care about cookies
- SponsorBlock
- BlockTube
- Decentraleyes
Instructions:
1. Download the .reg from below.
Completely safe to use, you can see what's inside their code at Github or via notepad.
- Brave: BraveFix.reg
- Chrome: GChromeFix.reg
- Edge: EdgeFix.reg
2. Open the downloaded .reg file to add the settings to the Windows Registry.
3. Restart your browser
Reduce Ping
Optimize Ethernet
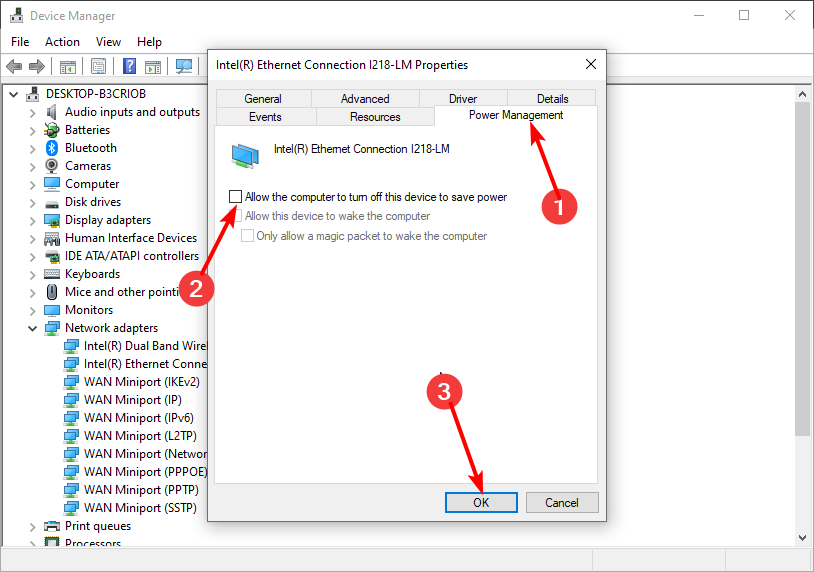
Step A: Disable power saving for the network adapter
The power management settings help to save energy on your PC. However, it can cause your game to slow down by turning off your driver when it needs to save power. Disabling this feature allows your network drivers to work constantly.
- Click the Windows key + X and select Device Manager.
- Double-click the Network adapters option to expand it.
- Right-click on your Ethernet adapter and select Properties.
- Click the Power Management tab.
- Uncheck the Allow the computer to turn off this device to save power option.
- Click on the OK button.
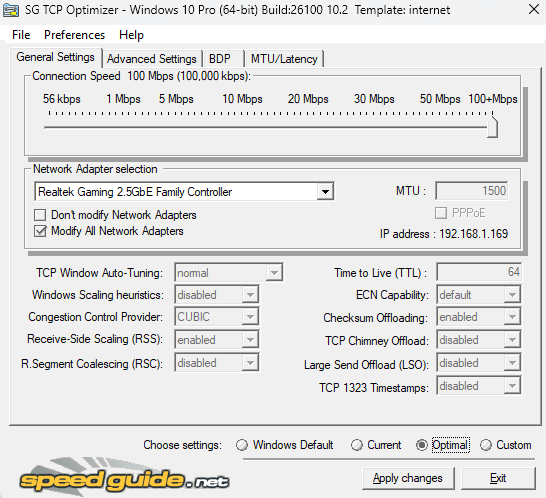
Step B: TCP Optimizer
Default settings for Ethernet adapters are highly unoptimized out of the box with Green Energy saving enabled and other things that are affecting your latency. This program will improve your internet throughput and latency whilst retaining all optimal functionality.
- Head over to https://www.speedguide.net/downloads.php
- Download and run TCP Optimizer 4
- Use Optimal settings within the program and Apply them.
Gaming Performance
Improve FPS
Important:
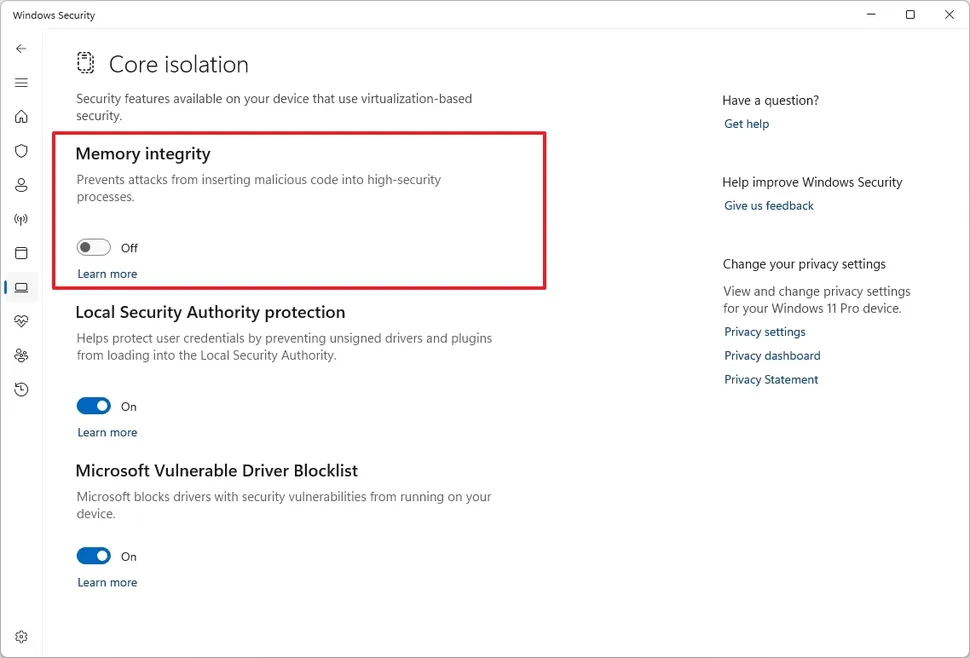
- Open Windows Security.
- Click on Device Security.
- Click the "Core isolation details" option on the right.
- Turn off the Memory Integrity toggle switch to disable the feature.
- Restart the computer.
Rest of the fixes:
- Install drivers from AMD/Nvidia website, instead of using Windows-provided version.
- If you have integrated GPU + standalone GPU, ensure that you are using the right GPU.
- Make sure your Power Profile is set to High or Ultimate Performance.
- Disable/Enable Game Mode, depending on your system (trial and error).
- Disable/Enable Hardware-accelerated GPU scheduling, depending on your system.
Photos & Paint
Extra Stuff
Debloating Windows 11 also removed the Photos app, here's a great alternative for photo viewing:
winget install picviewor
https://github.com/Ruben2776/PicViewAnd if you miss MS Paint:
winget install paint.netor
https://www.getpaint.net/download.htmlFile Explorer
Grouping and Action Bar
File Explorer Action Bar removal
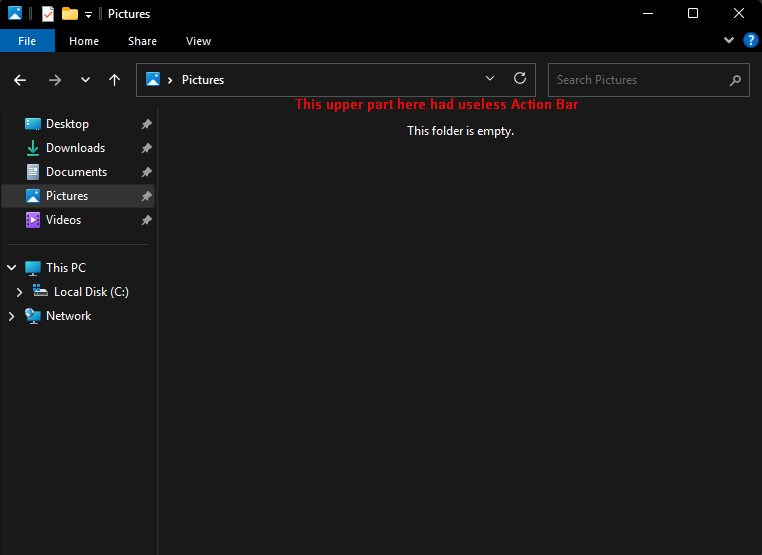
Download ExplorerBar.reg and run it after download. Note: you need to log out / log in or reboot your PC for the changes to appear.
Remove File Grouping (Group By)
- Press Win+R, type
regedit, and press Enter. - Navigate to:
HKEY_CURRENT_USER\Software\Microsoft\Windows\CurrentVersion\Explorer\Advanced - Right-click the right pane → New → DWORD (32-bit) Value → name it
UseAutoGrouping. - Set its value to
0. - Close Registry Editor and open File Explorer.
- Right-click any column header → Group by → (None).
- Restart File Explorer (log out / in or reboot) to apply globally.
Support
Buy me a coffee
If you found this website useful and want to support me to keep this site up to date, feel free to donate here for further development.
If you have any questions or need further help, attach your contact information (Discord, Telegram, Whatsapp or Email) on donation message. Sorry, but I simply do not have enough spare time to personally assist everyone otherwise.
Lambo fund:
BTC:
bc1qyj50p8ycr2eyuwk07uevp8eelavv6zhsl4wux8LTC:
LKWPLNTQdPqHQjqFKNW1xApNWmMDmcJ3CXETH:
0xe9fb84B9Fffb836424b83c242280104db8BB1427DOGE:
D6NQQKtNiFsfcRqxeDLpFPV6XFrGNG9XzD(Bonus) WinRAR Fix
Forever WinRAR
If you are like me and refuse to move to 7-Zip as a WinRAR die-hard then:
- Download
rarreg.keyfrom Github:
https://github.com/esurm/regs/blob/main/rarreg.key - Move
rarreg.keytoC:\Program Files\WinRAR
or wherever your WinRAR folder is located.
No more Trial notification pop-up when using WinRAR.
But objectively, 7-Zip is free, open-source and has a better compression ratio.
Старт
Как безопасно очистить Windows 11 от лишнего
Я потратил много времени, пытаясь полностью очистить и оптимизировать свою свежую установку Windows 11 после перехода с Windows 10. Вся информация есть в интернете, но она разрознена.
Поэтому я создал это руководство, которое проведет вас через чистую установку Windows 11, безопасную очистку существующей системы или бесплатную и легальную активацию Windows 11 без каких-либо рисков.
Вы также узнаете, как эффективно использовать Winget для установки приложений, удалять ненужное ПО из Проводника, оптимизировать сетевую карту и очищать браузер для улучшения конфиденциальности и производительности.
Все предоставленные скрипты полностью открыты и безопасны — они не устанавливают нежелательное ПО, а лишь изменяют скрытые настройки Windows 11 для оптимизации системы и защиты вашей конфиденциальности.
Источники:
- github/UnattendedWinstall
- Schneegans Unattend Generator
- ChrisTitusTech WinUtil
- FR33THY's Ultimate Windows Optimization Guide
- Tiny11Builder
- Massgrave.dev
- Winstall
- Ten Forums
- Eleven Forum
- Winaero Tweaker
Отказ от ответственности: Это руководство предназначено только для образовательных целей. Следуйте этим инструкциям на свой страх и риск. Всегда создавайте резервные копии важных данных перед внесением каких-либо системных изменений.
Чистая установка
Ключевые особенности
- Возможность выбора любой редакции Windows
- Обход системных требований Windows 11
- Пропуск принудительного создания учетной записи Microsoft во время установки Windows
- Удаление предустановленных ненужных приложений, кроме Microsoft Edge, Блокнота и Калькулятора
- Отключение Copilot и Recall
- Установка ключей реестра, связанных с конфиденциальностью, для отключения телеметрии
- Ограничение Windows Update только установкой обновлений безопасности и драйверов, без рискованных/раздутых функций.
- Оптимизация реестра с помощью различных ключей, связанных с оптимизацией и настройкой
- Отключение ненужных запланированных задач и фоновых служб
- Настройка служб и параметров Windows для оптимальной производительности
- Включение плана электропитания "Максимальная производительность"
Перейти к пошаговым инструкциям о том, как автоматизировать установку Windows 11 со всеми вышеупомянутыми исправлениями.
Чистая установка
Пошаговые инструкции
- Загрузите официальный ISO-образ Windows 11 с сайта Microsoft здесь.
Выберите последний вариант "Загрузка образа диска Windows 11 (ISO) для 64-разрядных устройств". - Загрузите autounattend.xml с GitHub.
Сохраните официальный файлautounattend.xmlна свой компьютер — он необходим для автоматизации чистой установки Windows 11. - Создайте загрузочный USB-накопитель с Windows 11 с помощью Rufus (скачать).
Используйте Rufus для создания загрузочного USB-накопителя из ISO-образа Windows 11. - Избегайте опций "Настроить ваш опыт Windows" в Rufus.
Не устанавливайте флажки в разделе "Настроить ваш опыт Windows". Их включение может создать конфликтующий файл unattend.xml, который переопределит ваши собственные настройки. - Скопируйте
autounattend.xmlна созданный вами USB-накопитель с Windows 11.
Поместите файлautounattend.xmlв корневой каталог вашего загрузочного USB-накопителя, чтобы установщик Windows мог его автоматически обнаружить. - Загрузитесь с USB-накопителя и выполните чистую установку.
Вставьте USB, загрузитесь с него и выполните стандартную чистую установку Windows 11. Ваши скрипты запустятся автоматически во время установки. - (Опционально) Пропустить ключ Windows.
Когда появится запрос на ввод ключа активации Windows 11, вы можете пропустить его ввод, если у вас нет ключа. Мы сможем активировать Windows бесплатно позже. - Используйте Центр обновления Windows после установки.
Перейдите к части 3. "Очистка существующей установки", чтобы убедиться, что все удаления ненужных программ применены правильно.
Очистка существующей установки
Ручная очистка
- Откройте PowerShell от имени администратора
Клавиша Windows + X, затем выберите PowerShell или Терминал в режиме (Администратор). - Скачайте UWscript.ps1 с Github.
- Щелкните правой кнопкой мыши по загруженному файлу
UWscript.ps1и выберите "Запустить с помощью PowerShell". - Следуйте инструкциям для удаления ненужных программ, отключения телеметрии и отслеживания, оптимизации реестра и многого другого.
Бесплатная активация Windows
Безопасная активация Windows 11
- Откройте PowerShell
Для этого нажмите клавишу Windows + X, затем выберите PowerShell или Терминал. - Скопируйте и вставьте код ниже, затем нажмите Enter.
irm https://get.activated.win | iex- Вы увидите варианты активации. Выберите первый вариант.
Теперь у вас полностью активированная Windows 11.
Вы также можете использовать этот инструмент для безопасной бесплатной активации Outlook, выбрав второй вариант.
Устанавливайте приложения проще
Winget
Вариант A:
Перейдите на сайт https://winstall.app/
Выберите все приложения и программы, которые вы хотите установить на свой ПК.
Используйте встроенные опции Winstall, чтобы установить все приложения сразу без лишнего ПО.
Вариант Б:
Вручную используйте команду winget в PowerShell.
Найдите приложения (например):
winget search braveили
winget search "google chrome"Загрузите приложения:
winget install Brave.Braveили
winget install Google.ChromeВы можете сделать то же самое для всех ваших любимых программ: Discord, VLC, Notepad++ и т.д.
Очистка браузера
Исправления реестра
- Попытки отключить телеметрию и отчеты об использовании
- Удаляет ненужные функции и предустановленное ПО
- Блокирует рекламный контент и ненужные элементы интерфейса
- Удаляет раздутый ИИ-функционал
- Сохраняет функциональность браузера при снижении потребления ресурсов
- Предварительно настраивает необходимые расширения:
- uBlock Origin
- Cookie AutoDelete
- Don't f*** with paste
- I still don't care about cookies
- SponsorBlock
- BlockTube
- Decentraleyes
Инструкции:
1. Скачайте .reg файл ниже.
Полностью безопасно, вы можете посмотреть код на Github или в блокноте.
- Brave: BraveFix.reg
- Chrome: GChromeFix.reg
- Edge: EdgeFix.reg
2. Откройте скачанный .reg файл, чтобы добавить настройки в реестр Windows.
3. Перезапустите ваш браузер
Снижение пинга
Оптимизация Ethernet
Шаг А: Отключите энергосбережение для сетевого адаптера
Настройки управления питанием помогают экономить энергию на вашем ПК. Однако это может привести к замедлению вашей игры, так как драйвер отключается для экономии энергии. Отключение этой функции позволяет сетевым драйверам работать постоянно.
- Нажмите клавишу Windows + X и выберите Диспетчер устройств.
- Дважды щелкните опцию Сетевые адаптеры, чтобы развернуть ее.
- Щелкните правой кнопкой мыши по вашему Ethernet-адаптеру и выберите Свойства.
- Перейдите на вкладку Управление электропитанием.
- Снимите флажок Разрешить отключение этого устройства для экономии энергии.
- Нажмите кнопку OK.
Шаг Б: TCP Optimizer
Стандартные настройки Ethernet-адаптеров сильно неоптимизированы и поставляются с включенным режимом энергосбережения и другими параметрами, влияющими на вашу задержку. Эта программа улучшит пропускную способность вашего интернета и уменьшит задержку, сохраняя при этом всю оптимальную функциональность.
- Перейдите на сайт https://www.speedguide.net/downloads.php
- Скачайте и запустите TCP Optimizer 4
- Используйте оптимальные настройки в программе и примените их.
Производительность в играх
Улучшение FPS
Важно:
- Откройте Безопасность Windows.
- Нажмите на Безопасность устройства.
- Нажмите на опцию "Сведения об изоляции ядра" справа.
- Выключите переключатель Целостность памяти, чтобы отключить функцию.
- Перезагрузите компьютер.
Остальные исправления:
- Установите драйверы с сайта AMD/Nvidia, а не версию, предоставленную Windows.
- Если у вас есть встроенная и дискретная видеокарты, убедитесь, что вы используете правильную.
- Убедитесь, что ваш план электропитания установлен на "Высокая" или "Максимальная производительность".
- Включите/отключите Игровой режим в зависимости от вашей системы (методом проб и ошибок).
- Включите/отключите Аппаратное ускорение GPU в зависимости от вашей системы.
Фото и Paint
Дополнительно
Очистка Windows 11 также удаляет приложение Фотографии, вот отличная альтернатива для просмотра фотографий:
winget install picviewили
https://github.com/Ruben2776/PicViewА если вы скучаете по MS Paint:
winget install paint.netили
https://www.getpaint.net/download.htmlПроводник
Группировка и панель действий
Удаление панели действий в Проводнике
Скачайте ExplorerBar.reg и запустите его после скачивания. Примечание: для применения изменений выйдите из системы и войдите снова или перезагрузите компьютер.
Отключение группировки файлов (Группировать по)
- Нажмите Win+R, введите
regeditи нажмите Enter. - Перейдите к:
HKEY_CURRENT_USER\Software\Microsoft\Windows\CurrentVersion\Explorer\Advanced - Щелкните правой кнопкой → Создать → Параметр DWORD (32 бита) → имя
UseAutoGrouping. - Установите значение
0. - Закройте редактор реестра и откройте Проводник.
- Щелкните правой кнопкой → Группировать по → (нет).
- Перезапустите Проводник (выйдите / войдите в систему или перезагрузитесь).
Поддержка
Угостить меня кофе
Если этот сайт был вам полезен и вы хотите поддержать меня, чтобы я мог поддерживать его в актуальном состоянии, не стесняйтесь пожертвовать здесь для дальнейшего развития.
Если у вас есть какие-либо вопросы или вам нужна дополнительная помощь, прикрепите свою контактную информацию (Discord, Telegram, Whatsapp или Email) в сообщении о пожертвовании. К сожалению, у меня просто не хватает свободного времени, чтобы лично помочь всем.
Фонд на Ламбо:
BTC:
bc1qyj50p8ycr2eyuwk07uevp8eelavv6zhsl4wux8LTC:
LKWPLNTQdPqHQjqFKNW1xApNWmMDmcJ3CXETH:
0xe9fb84B9Fffb836424b83c242280104db8BB1427DOGE:
D6NQQKtNiFsfcRqxeDLpFPV6XFrGNG9XzD(Бонус) Исправление WinRAR
WinRAR навсегда
Если вы, как и я, являетесь преданным поклонником WinRAR и отказываетесь переходить на 7-Zip, то:
- Скачайте
rarreg.keyс Github:
https://github.com/esurm/regs/blob/main/rarreg.key - Переместите
rarreg.keyвC:\Program Files\WinRAR
или туда, где находится ваша папка WinRAR.
Больше никаких всплывающих окон с уведомлением о пробном периоде при использовании WinRAR.
Но объективно говоря, 7-Zip бесплатен, имеет открытый исходный код и лучший коэффициент сжатия.
开始
如何安全地为 Windows 11 精简瘦身
从 Windows 10 切换过来后,我花了很多时间试图彻底清理和优化我的新 Windows 11 安装。所有信息都散落在各处。
所以我制作了这份指南,它将引导你完成 Windows 11 的全新安装、安全地为你现有的 Windows 11 系统进行精简,或者如何免费、合法且无风险地激活 Windows 11。
你还将学习如何使用 Winget 高效地安装应用程序,从文件资源管理器中移除臃肿软件,优化你的网卡,以及精简你的浏览器以获得更好的隐私和性能。
所有提供的脚本都是完全开源和安全的——它们不安装任何不必要的软件,只是修改 Windows 11 的隐藏设置,以帮助你优化系统和保护你的隐私。
来源:
- github/UnattendedWinstall
- Schneegans Unattend Generator
- ChrisTitusTech WinUtil
- FR33THY's Ultimate Windows Optimization Guide
- Tiny11Builder
- Massgrave.dev
- Winstall
- Ten Forums
- Eleven Forum
- Winaero Tweaker
免责声明: 本指南仅用于教育目的。请自行承担操作风险。在进行任何系统更改之前,请务必备份您的重要数据。
全新安装
主要特点
- 能够选择任何 Windows 版本
- 绕过 Windows 11 系统要求
- 在 Windows 安装过程中跳过强制创建微软账户
- 移除除 Microsoft Edge、记事本和计算器之外的预装臃肿应用
- 禁用 Copilot 和 Recall
- 设置与隐私相关的注册表项以禁用遥测
- 限制 Windows 更新仅安装安全和驱动更新,不安装有风险/臃肿的功能
- 通过各种优化和自定义相关的注册表项优化注册表
- 禁用不必要的计划任务和后台服务
- 配置 Windows 服务和设置以获得最佳性能
- 启用“卓越性能”电源计划
继续查看分步说明,了解如何使用上述所有修复程序自动化您的 Windows 11 安装。
全新安装
分步说明
- 从此处下载官方 Microsoft Windows 11 ISO。
选择最后一个选项“下载适用于 x64 设备的 Windows 11 磁盘映像 (ISO)”。 - 从GitHub 下载 autounattend.xml。
将官方autounattend.xml文件保存到您的计算机——这对于自动化您的 Windows 11 全新安装至关重要。 - 使用 Rufus (下载) 创建 Windows 11 可启动 USB。
使用 Rufus 从 Windows 11 ISO 制作可启动 USB 驱动器。 - 避免使用 Rufus 的“自定义您的 Windows 体验”选项。
不要勾选“自定义您的 Windows 体验”下的任何框。启用它们可能会生成一个冲突的 unattend.xml 文件,从而覆盖您自己的设置。 - 将
autounattend.xml复制到您创建的 Windows 11 USB 中。
将autounattend.xml文件放置在可启动 USB 驱动器的根目录中,以便 Windows 安装程序可以自动检测到它。 - 从 USB 启动并运行全新安装。
插入 USB,从中启动,然后进行标准的 Windows 11 全新安装。您的脚本将在安装过程中自动运行。 - (可选) 跳过 Windows 密钥。
当提示输入 Windows 11 激活密钥时,如果您没有可用的密钥,可以跳过输入。我们稍后可以免费激活 Windows。 - 安装后使用 Windows 更新程序。
然后继续第 3 部分“清理现有安装”,以确保所有臃肿软件移除都已正确应用。
清理现有安装
手动精简
- 以管理员身份打开 PowerShell
Windows 键 + X,然后选择 PowerShell 或终端(管理员模式)。 - 从 Github 下载 UWscript.ps1。
- 右键点击下载的
UWscript.ps1文件,然后选择“使用 PowerShell 运行”。 - 按照提示移除臃肿软件、禁用遥测和跟踪、优化注册表等。
免费 Windows 激活
安全激活 Windows 11
- 打开 PowerShell
要执行此操作,请按 Windows 键 + X,然后选择 PowerShell 或终端。 - 复制并粘贴下面的代码,然后按 Enter。
irm https://get.activated.win | iex- 您将看到激活选项。选择第一个选项。
您现在拥有一个完全激活的 Windows 11。
您还可以通过选择第二个选项使用此工具免费安全地激活 Outlook。
更轻松地安装应用
Winget
选项 A:
选择您想在电脑上安装的所有应用和程序。
使用 Winstall 的内置选项一次性安装所有应用,无臃肿软件。
选项 B:
在 PowerShell 中手动使用 winget 命令。
搜索应用示例:
winget search brave或
winget search "google chrome"下载应用:
winget install Brave.Brave或
winget install Google.Chrome您可以对所有您喜欢的程序执行相同的操作:Discord、VLC、Notepad++ 等。
浏览器清理
注册表修复
- 尝试禁用遥测和使用情况报告
- 移除不必要的功能和预装的臃肿软件
- 阻止促销内容和不必要的界面元素
- 移除AI相关的臃肿功能
- 在减少资源使用的同时保持浏览器功能
- 预配置必要的扩展程序:
- uBlock Origin
- Cookie AutoDelete
- Don't f*** with paste
- I still don't care about cookies
- SponsorBlock
- BlockTube
- Decentraleyes
说明:
1. 从下方下载 .reg 文件。
完全可以安全使用,您可以在 Github 或通过记事本查看其代码内容。
- Brave: BraveFix.reg
- Chrome: GChromeFix.reg
- Edge: EdgeFix.reg
2. 打开下载的 .reg 文件以将设置添加到 Windows 注册表。
3. 重启您的浏览器
降低延迟
优化以太网
步骤 A:禁用网络适配器的节能模式
电源管理设置有助于节省您电脑的能源。但是,它可能会因为在需要省电时关闭驱动程序而导致您的游戏变慢。禁用此功能可让您的网络驱动程序持续工作。
- 点击 Windows 键 + X 并选择设备管理器。
- 双击网络适配器选项以展开它。
- 右键单击您的以太网适配器并选择属性。
- 点击电源管理选项卡。
- 取消选中允许计算机关闭此设备以节约电源选项。
- 点击确定按钮。
步骤 B:TCP Optimizer
以太网适配器的默认设置在出厂时高度未优化,启用了绿色节能以及其他影响延迟的功能。此程序将改善您的互联网吞吐量和延迟,同时保留所有最佳功能。
- 前往 https://www.speedguide.net/downloads.php
- 下载并运行 TCP Optimizer 4
- 在程序中使用“Optimal”设置并应用它们。
游戏性能
提高 FPS
重要提示:
- 打开 Windows 安全中心。
- 点击 设备安全性。
- 点击右侧的 "内核隔离详细信息" 选项。
- 关闭 内存完整性 切换开关以禁用该功能。
- 重启计算机。
其余修复:
- 从 AMD/Nvidia 网站安装驱动程序,而不是使用 Windows 提供的版本。
- 如果您有集成显卡和独立显卡,请确保您使用的是正确的显卡。
- 确保您的电源计划设置为“高性能”或“卓越性能”。
- 根据您的系统启用/禁用游戏模式(反复试验)。
- 根据您的系统启用/禁用硬件加速 GPU 计划。
照片和画图
额外推荐
精简 Windows 11 也移除了照片应用,这里有一个很棒的照片查看器替代品:
winget install picview或者
https://github.com/Ruben2776/PicView如果你怀念微软画图 (MS Paint):
winget install paint.net或者
https://www.getpaint.net/download.html文件资源管理器
分组和操作栏
移除文件资源管理器操作栏
下载 ExplorerBar.reg 并运行。 注意:需要注销/重新登录或重启电脑以使更改生效。
移除文件分组(分组方式)
- 按 Win+R,输入
regedit并回车。 - 定位到:
HKEY_CURRENT_USER\Software\Microsoft\Windows\CurrentVersion\Explorer\Advanced - 右侧空白处右键 → 新建 → DWORD (32 位) 值 → 命名为
UseAutoGrouping。 - 数值数据设为
0。 - 关闭注册表编辑器并打开文件资源管理器。
- 右键列标题 → 分组方式 → (无)。
- 重启文件资源管理器(注销/登录或重启电脑)以全局生效。
支持
请我喝杯咖啡
如果您觉得这个网站对您有用,并希望支持我保持网站更新,欢迎在这里捐款以支持后续开发。
如果您有任何问题或需要进一步的帮助,请在捐款信息中附上您的联系方式(Discord、Telegram、Whatsapp 或电子邮件)。很抱歉,我实在没有足够的空闲时间来亲自帮助每一个人。
兰博基尼基金:
BTC:
bc1qyj50p8ycr2eyuwk07uevp8eelavv6zhsl4wux8LTC:
LKWPLNTQdPqHQjqFKNW1xApNWmMDmcJ3CXETH:
0xe9fb84B9Fffb836424b83c242280104db8BB1427DOGE:
D6NQQKtNiFsfcRqxeDLpFPV6XFrGNG9XzD(彩蛋) 修复 WinRAR
永远的 WinRAR
如果你和我一样,是 WinRAR 的铁杆粉丝,拒绝改用 7-Zip,那么:
- 从 Github 下载
rarreg.key:
https://github.com/esurm/regs/blob/main/rarreg.key - 将
rarreg.key移动到C:\Program Files\WinRAR
或你的 WinRAR 文件夹所在的任何位置。
使用 WinRAR 时再也不会弹出试用通知了。
但客观地说,7-Zip 免费、开源,并且有更好的压缩率。
Inicio
Cómo Limpiar Windows 11 de Forma Segura
Pasé una buena cantidad de tiempo tratando de limpiar y optimizar completamente mi instalación nueva de Windows 11 después de cambiar desde Windows 10. Toda la información está ahí fuera, pero dispersa.
Así que hice esta guía que te guiará a través de cómo hacer una instalación limpia de Windows 11 o limpiar de forma segura tu instalación existente de Windows 11 o cómo activar Windows 11 de forma gratuita y legal sin ningún riesgo.
También aprenderás a usar Winget para instalar aplicaciones de manera eficiente, eliminar el bloatware del Explorador de archivos de Windows, optimizar tu tarjeta de red y limpiar tu navegador para una mejor privacidad y rendimiento.
Todos los scripts proporcionados son de código abierto y seguros de ejecutar — no instalan ningún software no deseado, sino que simplemente modifican configuraciones ocultas de Windows 11 para ayudarte a optimizar tu sistema y proteger tu privacidad.
Fuentes:
- github/UnattendedWinstall
- Generador Unattend de Schneegans
- ChrisTitusTech WinUtil
- Guía Definitiva de Optimización de Windows de FR33THY
- Tiny11Builder
- Massgrave.dev
- Winstall
- Ten Forums
- Eleven Forum
- Winaero Tweaker
Descargo de responsabilidad: Esta guía es solo para fines educativos. Sigue estas instrucciones bajo tu propio riesgo. Siempre haz una copia de seguridad de tus datos importantes antes de realizar cualquier cambio en el sistema.
Instalación Limpia
Características Clave
- Posibilidad de elegir cualquier edición de Windows
- Omite los requisitos del sistema de Windows 11
- Salta la creación forzada de una cuenta de Microsoft durante la configuración de Windows
- Elimina aplicaciones de bloatware preinstaladas excepto Microsoft Edge, Bloc de notas y Calculadora
- Copilot y Recall están desactivados
- Establece claves de registro relacionadas con la privacidad para deshabilitar la telemetría
- Limita las actualizaciones de Windows para instalar solo actualizaciones de seguridad y controladores, sin funciones arriesgadas o pesadas.
- Optimiza el registro con varias claves relacionadas con la optimización y personalización
- Deshabilita tareas programadas y servicios en segundo plano innecesarios
- Configura los servicios y ajustes de Windows para un rendimiento óptimo
- Habilita el plan de energía de Máximo Rendimiento
Continuar a las Instrucciones Paso a Paso sobre cómo automatizar la instalación de Windows 11 con todas las correcciones mencionadas.
Instalación Limpia
Instrucciones Paso a Paso
Haz Clic Aquí para el Tutorial en Video
- Descarga la ISO oficial de Microsoft Windows 11 desde aquí.
Elige la última opción "Descargar imagen de disco de Windows 11 (ISO) para dispositivos x64" - Descarga autounattend.xml desde GitHub.
Guarda el archivo oficialautounattend.xmlen tu computadora—esencial para automatizar tu instalación limpia de Windows 11. - Crea un USB de arranque de Windows 11 con Rufus (Descargar).
Usa Rufus para crear una unidad USB de arranque a partir de una ISO de Windows 11. - Evita las opciones de "Personalizar tu experiencia de Windows" de Rufus.
No marques ninguna casilla en "Personalizar tu experiencia de Windows". Habilitarlas puede generar un archivo unattend.xml conflictivo que anule tus propias configuraciones. - Copia
autounattend.xmlal USB de Windows 11 que creaste.
Coloca el archivoautounattend.xmlen el directorio raíz de tu unidad USB de arranque para que el instalador de Windows pueda detectarlo automáticamente. - Arranca desde el USB y realiza una instalación limpia.
Inserta el USB, arranca desde él y procede con una instalación limpia estándar de Windows 11. Tus scripts se ejecutarán automáticamente durante la instalación. - (Opcional) Omitir la clave de Windows.
Cuando se te pida la clave de activación de Windows 11, puedes omitir su ingreso si no tienes una. Podemos activar Windows de forma gratuita más tarde. - Usa el Actualizador de Windows después de la instalación.
Procede a la parte 3. Limpiar Instalación Existente para asegurarte de que toda la eliminación de bloatware se aplique correctamente.
Limpiar Instalación Existente
Limpieza Manual
- Abrir PowerShell como Administrador
Tecla de Windows + X, luego selecciona PowerShell o Terminal en modo (Administrador). - Descarga UWscript.ps1 desde Github.
- Haz clic derecho en el archivo
UWscript.ps1descargado y elige "Ejecutar con PowerShell". - Sigue las indicaciones para eliminar bloatware, desactivar telemetría y seguimiento, optimizar el registro y más.
Activación Gratuita de Windows
Activar Windows 11 de Forma Segura
- Abre PowerShell
Para hacerlo, presiona la tecla de Windows + X, luego selecciona PowerShell o Terminal. - Copia y pega el código a continuación, luego presiona Enter.
irm https://get.activated.win | iex- Verás las opciones de activación. Elige la primera opción.
Ahora tienes un Windows 11 completamente activado.
También puedes usar esta herramienta para activar Outlook de forma segura y gratuita eligiendo la segunda opción.
Instalar Apps Más Fácilmente
Winget
Opción A:
Selecciona todas las aplicaciones y programas que desees en tu PC.
Usa las opciones integradas de Winstall para instalar todas tus aplicaciones a la vez sin bloatware.
Opción B:
Usa manualmente el comando winget en PowerShell.
Busca aplicaciones con un ejemplo:
winget search braveo
winget search "google chrome"Descarga aplicaciones:
winget install Brave.Braveo
winget install Google.ChromePuedes hacer lo mismo con todos tus programas favoritos: Discord, VLC, Notepad++, etc.
Limpieza del Navegador
Arreglos de Registro
- Intenta deshabilitar la telemetría y los informes de uso
- Elimina funciones innecesarias y bloatware preinstalado
- Bloquea contenido promocional y elementos de interfaz innecesarios
- Elimina el bloatware de IA
- Mantiene la funcionalidad del navegador mientras reduce el uso de recursos
- Preconfigura extensiones esenciales:
- uBlock Origin
- Cookie AutoDelete
- Don't f*** with paste
- I still don't care about cookies
- SponsorBlock
- BlockTube
- Decentraleyes
Instrucciones:
1. Descarga el archivo .reg de abajo.
Es completamente seguro de usar, puedes ver lo que hay dentro de su código en Github o mediante el bloc de notas.
- Brave: BraveFix.reg
- Chrome: GChromeFix.reg
- Edge: EdgeFix.reg
2. Abre el archivo .reg descargado para agregar la configuración al Registro de Windows.
3. Reinicia tu navegador
Reducir el Ping
Optimizar Ethernet
Paso A: Deshabilitar el ahorro de energía para el adaptador de red
La configuración de administración de energía ayuda a ahorrar energía en tu PC. Sin embargo, puede hacer que tu juego se ralentice al apagar el controlador cuando necesita ahorrar energía. Deshabilitar esta función permite que tus controladores de red funcionen constantemente.
- Haz clic en la tecla de Windows + X y selecciona Administrador de dispositivos.
- Haz doble clic en la opción Adaptadores de red para expandirla.
- Haz clic derecho en tu adaptador de Ethernet y selecciona Propiedades.
- Haz clic en la pestaña Administración de energía.
- Desmarca la opción Permitir que el equipo apague este dispositivo para ahorrar energía.
- Haz clic en el botón Aceptar.
Paso B: TCP Optimizer
La configuración predeterminada de los adaptadores Ethernet está muy desoptimizada de fábrica, con el ahorro de energía verde habilitado y otras cosas que afectan tu latencia. Este programa mejorará el rendimiento y la latencia de tu internet conservando toda la funcionalidad óptima.
- Dirígete a https://www.speedguide.net/downloads.php
- Descarga y ejecuta TCP Optimizer 4
- Usa la configuración Óptima dentro del programa y aplícala.
Rendimiento en Juegos
Mejorar FPS
Importante:
- Abre Seguridad de Windows.
- Haz clic en Seguridad del dispositivo.
- Haz clic en la opción "Detalles de aislamiento del núcleo" a la derecha.
- Desactiva el interruptor de Integridad de memoria para deshabilitar la función.
- Reinicia la computadora.
Resto de las correcciones:
- Instala los controladores desde el sitio web de AMD/Nvidia, en lugar de usar la versión proporcionada por Windows.
- Si tienes una GPU integrada + una GPU dedicada, asegúrate de estar utilizando la GPU correcta.
- Asegúrate de que tu perfil de energía esté configurado en Alto o Máximo rendimiento.
- Habilita/deshabilita el Modo de juego, según tu sistema (prueba y error).
- Habilita/deshabilita la programación de GPU acelerada por hardware, según tu sistema.
Fotos y Paint
Cosas Extra
La limpieza de Windows 11 también eliminó la aplicación Fotos, aquí tienes una excelente alternativa para ver fotos:
winget install picviewo
https://github.com/Ruben2776/PicViewY si extrañas MS Paint:
winget install paint.neto
https://www.getpaint.net/download.htmlExplorador de Archivos
Agrupación y Barra de Acciones
Eliminación de la barra de acciones del Explorador de Archivos
Descarga ExplorerBar.reg y ejecútalo tras la descarga. Nota: es necesario cerrar sesión y volver a iniciar o reiniciar el PC para aplicar los cambios.
Eliminar agrupación de archivos (Agrupar por)
- Presiona Win+R, escribe
regedity pulsa Enter. - Navega hasta:
HKEY_CURRENT_USER\Software\Microsoft\Windows\CurrentVersion\Explorer\Advanced - Clic derecho en el panel derecho → Nuevo → Valor DWORD (32 bits) → nombre
UseAutoGrouping. - Establece su valor en
0. - Cierra el Editor del Registro y abre el Explorador de archivos.
- Clic derecho en encabezado de columna → Agrupar por → (Ninguno).
- Reinicia el Explorador (cierra sesión o reinicia) para aplicar globalmente.
Soporte
Cómprame un café
Si encontraste útil este sitio web y quieres apoyarme para mantenerlo actualizado, siéntete libre de donar aquí para su futuro desarrollo.
Si tienes alguna pregunta o necesitas más ayuda, adjunta tu información de contacto (Discord, Telegram, Whatsapp o Email) en el mensaje de donación. Lo siento, pero simplemente no tengo suficiente tiempo libre para ayudar personalmente a todos de otra manera.
Fondo para el Lambo:
BTC:
bc1qyj50p8ycr2eyuwk07uevp8eelavv6zhsl4wux8LTC:
LKWPLNTQdPqHQjqFKNW1xApNWmMDmcJ3CXETH:
0xe9fb84B9Fffb836424b83c242280104db8BB1427DOGE:
D6NQQKtNiFsfcRqxeDLpFPV6XFrGNG9XzD(Bonus) Arreglo para WinRAR
WinRAR para Siempre
Si eres como yo y te niegas a cambiar a 7-Zip como un fanático de WinRAR, entonces:
- Descarga
rarreg.keydesde Github:
https://github.com/esurm/regs/blob/main/rarreg.key - Mueve
rarreg.keyaC:\Program Files\WinRAR
o donde sea que se encuentre tu carpeta de WinRAR.
No más ventanas emergentes de notificación de prueba al usar WinRAR.
Pero objetivamente, 7-Zip es gratuito, de código abierto y tiene una mejor relación de compresión.